How to make a genuinely 'self-watering' container garden
If you're looking for a highly productive and elegant growing system that is genuinely 'self watering', this system from Canada is brilliant! I'd grade it as 'Harder' because you need a few specialist tools and some practical DIY skills. But anyone who's happy to tackle simple carpentry or plumbing jobs at home - and has a bit of patience - could have a crack at this.

These wooden containers have reservoirs underneath that are constantly topped up by from the water butt on the right. The water butt is made out of an old olive barrel!
The investment of time and effort will repay itself in time saved watering and higher yields (5kgs of runner beans came off just one of these containers in a summer - more on how reservoirs increase yields here.) If watering is a big issue for you and you don't feel up to attempting building this - don't worry! There are other automatic watering systems - like drip feed - that are easier to set up. The idea behind this system was adapted from the free, downloadable guide: "Guide to setting up your own edible rooftop garden", by Rooftop Garden Project, Montreal, Canada - who I'm indebted to for many fantastic ideas! If you decide to build your own, please use this guide in conjunction with my notes below. There is lots of scope to adapt the idea in other ways, too - I'd love to hear from you if you decide to experiment.
You will need:
A horizontal surface that the containers will finally sit on (each container must be at the same level or the the automatic self watering system will not work), plus: - Wood to make the boxes (I used soft wood found in a skip; hard wood would be better if you can lay your hands on some). - Corrugated plastic sheets to make the false bottoms (I used old estate agent signs). - 110mm (4inch) drainage pipe. 80mm can also be used but 110 mm is better if you can find it (lengths are commonly discarded in skips). - Large empty plastic boxes, one for each container, to act as reservoirs (I used old 50 litre recylcling boxes) and one plastic container to use as a 'control box'. - Zip ties, ring ties or cable ties (different names for the same thing). - Screws. - A drill, a 110mm hole saw, a mitre saw, and screwdriver.
Here's how to do it
1. Construct the wooden boxes. One advantage of using wood is that you can create boxes to fit the size of the space. You can preserve wood with Osmo wood oil or linseed oil, and line the wooden boxes with plastic to slow down the rotting. Be aware that the weight of a large wooden box plus soil can be considerable (I placed these boxes on top of a load bearing wall to hold their weight).

This shows the simple wooden boxes with the plastic reservoirs in the bottom. The right hand box also has it's 'feet' cut - grey 110mm drainage pipe. The corrugated plastic false bottom will rest on top of these feet.
2. Find a plastic container that fits inside the box to act as a reservoir (the green boxes above). This reservoir needs to be 15cm - 20cm (6 - 8 inches) high - you can use a hacksaw or jigsaw to cut the top off if it's too tall (I used old 50 litre recycling boxes, and cut the top off). The reservoir does not have to be the exact size of the wooden box - just large enough to hold a reasonable supply of water. If the plastic box has holes in the bottom (most recycling boxes do, unfortunately), you'll need to make it waterproof. The easiest way I found is to block them up with a silicone sealant. 3. Drill a 1cm diameter hole about 12 cm above the bottom of each plastic reservoir. This is an overflow hole and prevents overwatering of your plants. 4. Drill lots of holes in the 110mm (4 inch) drainage pipe and then cut it into 15cm (6 inch) lengths (you want 20 - 30 holes in each 6 inch length). You can see the cut bits of pipe in the top right hand box in the picture above. These bits of pipe will next be attached to the false bottom of the container, like feet (you can see them attached, below). Filled with soil they'll sit in the water of the reservoir and wick the water up into the main part of the container. The number of 'feet' you need in each container depends on its surface area. Garden Rooftops say that the surface area of the feet should be 5 - 15% of the surface area of the container. More than than this and your soil may get water logged, less and it may dry out. For these 60cm x 60cm containers, I calculated that four 110cm diameter feet would be about right.

The corrugated plastic is cut to fit into the box and sits on top of the reservoir. I added a wooden ledge to hold it secure at the sides. You can also see the 'feet' attached with ring ties. The surface area of these feet should make up 5 - 15% of the total surface area.
5. Cut some corrugated plastic card (I used old estate agent signs) to fit snugly inside the box. This will sit on top of the reservoir and separate the soil from the water. Drill lots of small holes in the plastic to allow air to circulate into the soil and your plant roots. 6. Using a hole saw attached to a drill, drill 110mm holes in the corrugated plastic, one hole for each foot you're adding. Keep the round 'waste' cut-outs and attach one to the bottom of each 'foot' to make a base so that the soil can't fall out (you can see this in the picture above). 7. Attach the 110mm pipe to the underneath of the corrugated plastic with three or four ring ties. Put this into the wooden box with the feet sitting in the plastic reservoir. Apart from a tube of plumbing to add water, your container is now finished. 8. You can now either simply add a PVC fill- tube (50 - 80mm) by drilling another hole in the plastic false floor and inserting the tube - it needs to be long enough to protrude from the soil when the container is filled. 9. Or you can plumb several reservoirs together and link them up to a control tank (with a ball cock to control the water level). For the plumbing bits you can either use quick-fit (or similar) plumbing sold in plumbing stores or contact a company that sells garden watering systems (like Garden Magic) or hydroponics. See my images below and page 52 of the 'Guide to Setting up your Own Edible Garden' for instructions on how to make this.

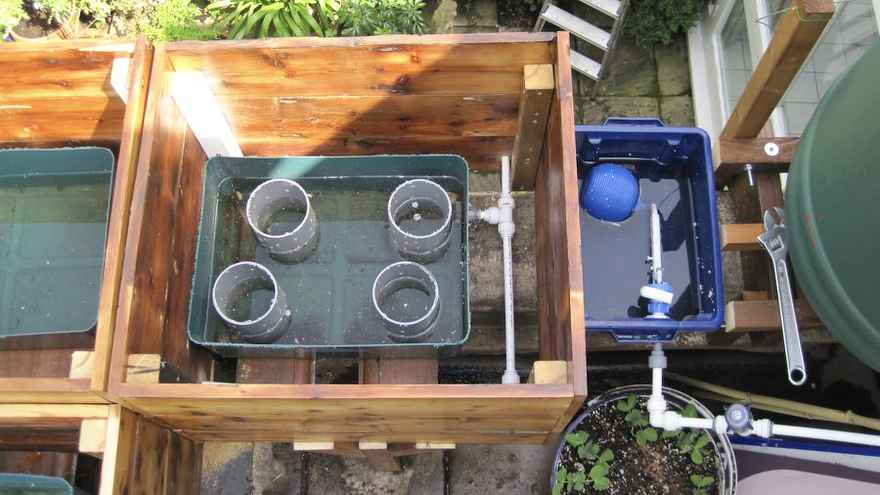
Here you can see how the reservoirs are linked together with plumbing pipe and connectors.
The blue box is the control box - this controls the water flow into the reservoirs. It works on exactly the same principle as a cistern of a loo. When the water in the reservoirs falls, the ball cock opens and lets in water from the water butt. Simple and effective!

And here it is in action. It was possible to leave this for weeks - all watered automatically. Unfortunately, not all the containers on the balcony were rigged up to this system so we still needed to get friends round to water when we went away!
54 comments
Leave a comment